
基本介绍
在现在的开发过程中还有很大一部分公司都是以口口相传的方式来进行前后端的联调,而接口文档很大一部分都只停留在了说说而已的地步,或者写了代码再写文档。 还有一点就是文档的修改,定义好的接口并不是一成不变的,可能在开发过程中文档修改不止一次的变化,这个时候就会很难受了。 只要不是强制性要求,没人会愿意写这东西,而且在写的过程中,一个字母的错误就会导致联调时候的很大麻烦,但是通过Swagger,我们可以省略了这一步,而且文档出错率近乎于零, 只要你在写代码的时候,稍加几个注解,文档自动生成。
1、在控制层Controller中添加注解来描述接口信息如:
@Api("参数配置")
@Controller
@RequestMapping("/system/config")
public class ConfigController
2、在方法中配置接口的标题信息
@ApiOperation("查询参数列表")
@ResponseBody
public TableDataInfo list(Config config)
{
	startPage();
	List<Config> list = configService.selectConfigList(config);
	return getDataTable(list);
}3、在系统工具-系统接口测试相关接口
注意:SwaggerConfig可以指定根据注解或者包名扫描具体的APIAPI详细说明
| 作用范围 | API | 使用位置 |
|---|---|---|
| 协议集描述 | @Api | 用于controller类上 |
| 对象属性 | @ApiModelProperty | 用在出入参数对象的字段上 |
| 协议描述 | @ApiOperation | 用在controller的方法上 |
| Response集 | @ApiResponses | 用在controller的方法上 |
| Response | @ApiResponse | 用在 @ApiResponses里边 |
| 非对象参数集 | @ApiImplicitParams | 用在controller的方法上 |
| 非对象参数描述 | @ApiImplicitParam | 用在@ApiImplicitParams的方法里边 |
| 描述返回对象的意义 | @ApiModel | 用在返回对象类上 |
api标记,用在类上,说明该类的作用。可以标记一个Controller类做为Swagger文档资源,使用方式:
@Api(value = "/user", description = "用户管理")与Controller注解并列使用。 属性配置:
| 属性名称 | 备注 |
|---|---|
| value | url的路径值 |
| tags | 如果设置这个值、value的值会被覆盖 |
| description | 对api资源的描述 |
| basePath | 基本路径可以不配置 |
| position | 如果配置多个Api 想改变显示的顺序位置 |
| produces | For example, "application/json, application/xml" |
| consumes | For example, "application/json, application/xml" |
| protocols | Possible values: http, https, ws, wss. |
| authorizations | 高级特性认证时配置 |
| hidden | 配置为true 将在文档中隐藏 |
ApiOperation标记,用在方法上,说明方法的作用,每一个url资源的定义,使用方式:
@ApiOperation("获取用户信息")与Controller中的方法并列使用,属性配置:
| 属性名称 | 备注 |
|---|---|
| value | url的路径值 |
| tags | 如果设置这个值、value的值会被覆盖 |
| description | 对api资源的描述 |
| basePath | 基本路径可以不配置 |
| position | 如果配置多个Api 想改变显示的顺序位置 |
| produces | For example, "application/json, application/xml" |
| consumes | For example, "application/json, application/xml" |
| protocols | Possible values: http, https, ws, wss. |
| authorizations | 高级特性认证时配置 |
| hidden | 配置为true将在文档中隐藏 |
| response | 返回的对象 |
| responseContainer | 这些对象是有效的 "List", "Set" or "Map".,其他无效 |
| httpMethod | "GET", "HEAD", "POST", "PUT", "DELETE", "OPTIONS" and "PATCH" |
| code | http的状态码 默认 200 |
| extensions | 扩展属性 |
ApiParam标记,请求属性,使用方式:
public TableDataInfo list(@ApiParam(value = "查询用户列表", required = true)User user)与Controller中的方法并列使用,属性配置:
| 属性名称 | 备注 |
|---|---|
| name | 属性名称 |
| value | 属性值 |
| defaultValue | 默认属性值 |
| allowableValues | 可以不配置 |
| required | 是否属性必填 |
| access | 不过多描述 |
| allowMultiple | 默认为false |
| hidden | 隐藏该属性 |
| example | 举例子 |
piResponse标记,响应配置,使用方式:
@ApiResponse(code = 400, message = "查询用户失败")与Controller中的方法并列使用,属性配置:
| 属性名称 | 备注 |
|---|---|
| code | http的状态码 |
| message | 描述 |
| response | 默认响应类 Void |
| reference | 参考ApiOperation中配置 |
| responseHeaders | 参考 ResponseHeader 属性配置说明 |
| responseContainer | 参考ApiOperation中配置 |
ApiResponses标记,响应集配置,使用方式:
@ApiResponses({ @ApiResponse(code = 400, message = "无效的用户") })与Controller中的方法并列使用,属性配置:
| 属性名称 | 备注 |
|---|---|
| value | 多个ApiResponse配置 |
ResponseHeader标记,响应头设置,使用方法
@ResponseHeader(name="head",description="响应头设计")与Controller中的方法并列使用,属性配置:
| 属性名称 | 备注 |
|---|---|
| name | 响应头名称 |
| description | 描述 |
| response | 默认响应类 void |
| responseContainer | 参考ApiOperation中配置 |
如何使用
1、添加依赖
<!-- SpringBoot Web -->
<dependency>
	<groupId>org.springframework.boot</groupId>
	<artifactId>spring-boot-starter-web</artifactId>
</dependency>

<!-- Swagger -->
<dependency>
	<groupId>io.springfox</groupId>
	<artifactId>springfox-swagger2</artifactId>
	<version>${swagger.fox.version}</version>
</dependency>

<!-- Swagger UI -->
<dependency>
	<groupId>io.springfox</groupId>
	<artifactId>springfox-swagger-ui</artifactId>
	<version>${swagger.fox.version}</version>
</dependency>2、在application.yml添加服务配置
server:
  port: 6666

spring:
  application:
name: ruoyi-xxxx3、在Application启动类加入注解@SpringBootApplication。
@EnableSwagger2
@SpringBootApplication
public class RuoYiSwaggerApplication
{
    public static void main(String[] args)
    {
        SpringApplication.run(RuoYiSwaggerApplication.class, args);
        System.out.println("(♥◠‿◠)ノ゙  Swagger启动成功   ლ(´ڡ`ლ)゙  \n" +
                " .-------.       ____     __        \n" +
                " |  _ _   \\      \\   \\   /  /    \n" +
                " | ( ' )  |       \\  _. /  '       \n" +
                " |(_ o _) /        _( )_ .'         \n" +
                " | (_,_).' __  ___(_ o _)'          \n" +
                " |  |\\ \\  |  ||   |(_,_)'         \n" +
                " |  | \\ `'   /|   `-'  /           \n" +
                " |  |  \\    /  \\      /           \n" +
                " ''-'   `'-'    `-..-'              ");
    }
}4、添加TestUserController.java,模拟接口返回用户信息。
import org.springframework.web.bind.annotation.GetMapping;
import org.springframework.web.bind.annotation.RestController;

@RestController
public class TestUserController
{
    @GetMapping("/user/info")
    public Object info()
    {
        return "{\"username\":\"admin\",\"password\":\"admin123\"}";
    }
}5、访问http://localhost:6666/swagger-ui/index.html,测试验证接口返回正确数据表示测试通过。
接口模块
项目中存在common-swagger模块,可以直接依赖后使用。
common-swagger模块:gulimall-swagger-spring-boot-starter- 引入依赖
xml<!-- SpringBoot Web --> <dependency> <groupId>org.springframework.boot</groupId> <artifactId>spring-boot-starter-web</artifactId> </dependency> <!-- Swagger --> <dependency> <groupId>io.springfox</groupId> <artifactId>springfox-swagger2</artifactId> <version>${swagger.fox.version}</version> </dependency>- 自定义Swagger注解
java@Target({ ElementType.TYPE }) @Retention(RetentionPolicy.RUNTIME) @Documented @Inherited @Import({ SwaggerAutoConfiguration.class }) public @interface EnableCustomSwagger2 { }- Swagger相关属性
java/** * Swagger 配置 */ @Data @ConfigurationProperties("swagger") public class SwaggerProperties { /** * 是否开启swagger */ private Boolean enabled; /** * swagger会解析的包路径 **/ private String basePackage = ""; /** * swagger会解析的url规则 **/ private List<String> basePath = new ArrayList<>(); /** * 在basePath基础上需要排除的url规则 **/ private List<String> excludePath = new ArrayList<>(); /** * 标题 **/ private String title = ""; /** * 描述 **/ private String description = ""; /** * 版本 **/ private String version = ""; /** * 许可证 **/ private String license = ""; /** * 许可证URL **/ private String licenseUrl = ""; /** * 服务条款URL **/ private String termsOfServiceUrl = ""; /** * host信息 **/ private String host = ""; /** * 联系人信息 */ private Contact contact = new Contact(); /** * 全局统一鉴权配置 **/ private Authorization authorization = new Authorization(); @Data public static class Contact { /** * 联系人 **/ private String name = ""; /** * 联系人url **/ private String url = ""; /** * 联系人email **/ private String email = ""; } @Data public static class Authorization { /** * 鉴权策略ID,需要和SecurityReferences ID保持一致 */ private String name = ""; /** * 需要开启鉴权URL的正则 */ private String authRegex = "^.*quot;; /** * 鉴权作用域列表 */ private List<AuthorizationScope> authorizationScopeList = new ArrayList<>(); private List<String> tokenUrlList = new ArrayList<>(); } @Data public static class AuthorizationScope { /** * 作用域名称 */ private String scope = ""; /** * 作用域描述 */ private String description = ""; } }- swagger配置类
java@Primary @Configuration @EnableSwagger2 @EnableConfigurationProperties(SwaggerProperties.class) @ConditionalOnProperty(name = "swagger.enabled", matchIfMissing = true) @Import({SwaggerWebConfiguration.class}) public class SwaggerAutoConfiguration { /** * 默认的排除路径,排除Spring Boot默认的错误处理路径和端点 */ private static final List<String> DEFAULT_EXCLUDE_PATH = Arrays.asList("/error", "/actuator/**"); private static final String BASE_PATH = "/**"; @Bean public Docket api(SwaggerProperties swaggerProperties) { // base-path处理 if (swaggerProperties.getBasePath().isEmpty()) { swaggerProperties.getBasePath().add(BASE_PATH); } // noinspection unchecked List<Predicate<String>> basePath = new ArrayList<Predicate<String>>(); swaggerProperties.getBasePath().forEach(path -> basePath.add(PathSelectors.ant(path))); // exclude-path处理 if (swaggerProperties.getExcludePath().isEmpty()) { swaggerProperties.getExcludePath().addAll(DEFAULT_EXCLUDE_PATH); } List<Predicate<String>> excludePath = new ArrayList<>(); swaggerProperties.getExcludePath().forEach(path -> excludePath.add(PathSelectors.ant(path))); ApiSelectorBuilder builder = new Docket(DocumentationType.SWAGGER_2).host(swaggerProperties.getHost()) .apiInfo(apiInfo(swaggerProperties)).select() .apis(RequestHandlerSelectors.basePackage(swaggerProperties.getBasePackage())); swaggerProperties.getBasePath().forEach(p -> builder.paths(PathSelectors.ant(p))); swaggerProperties.getExcludePath().forEach(p -> builder.paths(PathSelectors.ant(p).negate())); return builder.build().securitySchemes(securitySchemes()).securityContexts(securityContexts()).pathMapping("/"); } /** * 安全模式,这里指定token通过Authorization头请求头传递 */ private List<SecurityScheme> securitySchemes() { List<SecurityScheme> apiKeyList = new ArrayList<SecurityScheme>(); apiKeyList.add(new ApiKey("Authorization", "Authorization", "header")); return apiKeyList; } /** * 安全上下文 */ private List<SecurityContext> securityContexts() { List<SecurityContext> securityContexts = new ArrayList<>(); securityContexts.add( SecurityContext.builder() .securityReferences(defaultAuth()) .operationSelector(o -> o.requestMappingPattern().matches("/.*")) .build()); return securityContexts; } /** * 默认的全局鉴权策略 * * @return */ private List<SecurityReference> defaultAuth() { AuthorizationScope authorizationScope = new AuthorizationScope("global", "accessEverything"); AuthorizationScope[] authorizationScopes = new AuthorizationScope[1]; authorizationScopes[0] = authorizationScope; List<SecurityReference> securityReferences = new ArrayList<>(); securityReferences.add(new SecurityReference("Authorization", authorizationScopes)); return securityReferences; } private ApiInfo apiInfo(SwaggerProperties swaggerProperties) { return new ApiInfoBuilder() .title(swaggerProperties.getTitle()) .description(swaggerProperties.getDescription()) .license(swaggerProperties.getLicense()) .licenseUrl(swaggerProperties.getLicenseUrl()) .termsOfServiceUrl(swaggerProperties.getTermsOfServiceUrl()) .contact(new Contact(swaggerProperties.getContact().getName(), swaggerProperties.getContact().getUrl(), swaggerProperties.getContact().getEmail())) .version(swaggerProperties.getVersion()) .build(); } }- swagger 资源映射路径
javapublic class SwaggerWebConfiguration implements WebMvcConfigurer { @Override public void addResourceHandlers(ResourceHandlerRegistry registry) { /** swagger-ui 地址 */ registry.addResourceHandler("/swagger-ui/**") .addResourceLocations("classpath:/META-INF/resources/webjars/springfox-swagger-ui/"); } }- 在src/main/resources/META-INF/spring/org.springframework.boot.autoconfigure.AutoConfiguration.imports文件中加入Spring容器管理
tex# com.klaus.gulimall.springboot.starter.swagger.config.SwaggerAutoConfiguration # com.klaus.gulimall.springboot.starter.swagger.config.SwaggerWebConfiguration
1、业务模块添加依赖
<dependency>
    <groupId>com.klaus.gulimall</groupId>
    <artifactId>gulimall-swagger-spring-boot-starter</artifactId>
    <version>0.0.1-SNAPSHOT</version>
</dependency>2、在xxxx-dev.yml添加swagger配置
# swagger配置
swagger:
  title: 系统模块接口文档
  license: Powered By imklaus
licenseUrl: https://imlklaus.github.io/3、在Application启动类加入系统接口注解@EnableCustomSwagger2
@EnableCustomConfig
@EnableCustomSwagger2
@EnableRyFeignClients
@SpringCloudApplication
public class RuoYiSystemApplication
{
public static void main(String[] args)
{
SpringApplication.run(RuoYiSystemApplication.class, args);
System.out.println("(♥◠‿◠)ノ゙ 系统模块启动成功 ლ(´ڡ`ლ)゙ \n" +
" .-------. ____ __ \n" +
" | _ _ \\ \\ \\ / / \n" +
" | ( ' ) | \\ _. / ' \n" +
" |(_ o _) / _( )_ .' \n" +
" | (_,_).' __ ___(_ o _)' \n" +
" | |\\ \\ | || |(_,_)' \n" +
" | | \\ `' /| `-' / \n" +
" | | \\ / \\ / \n" +
" ''-' `'-' `-..-' ");
}
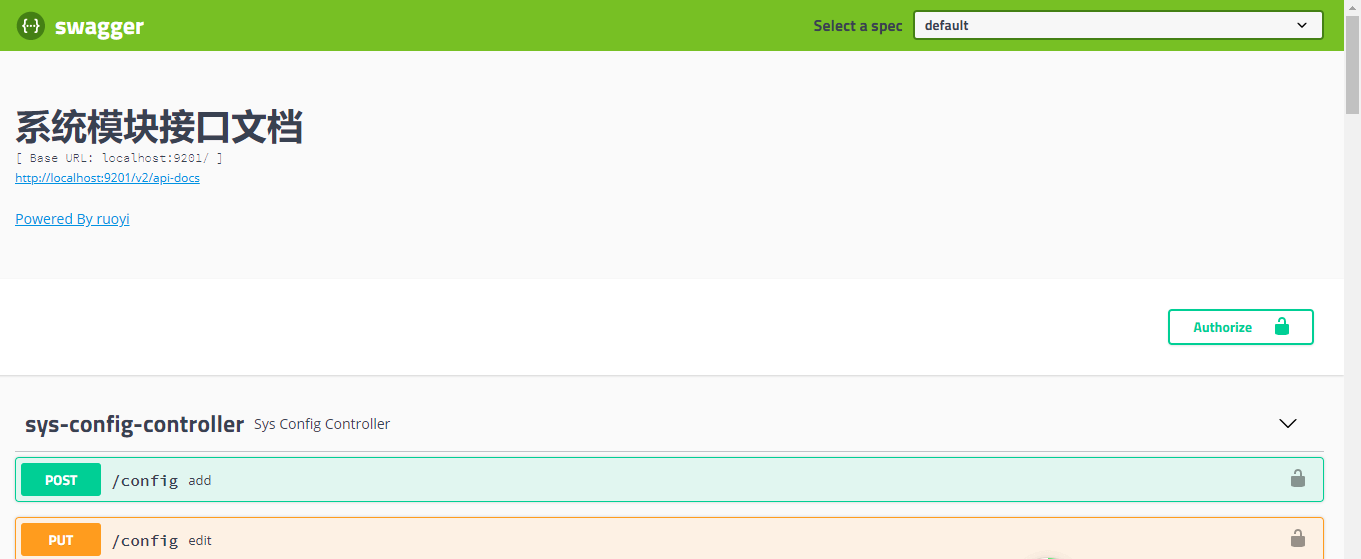
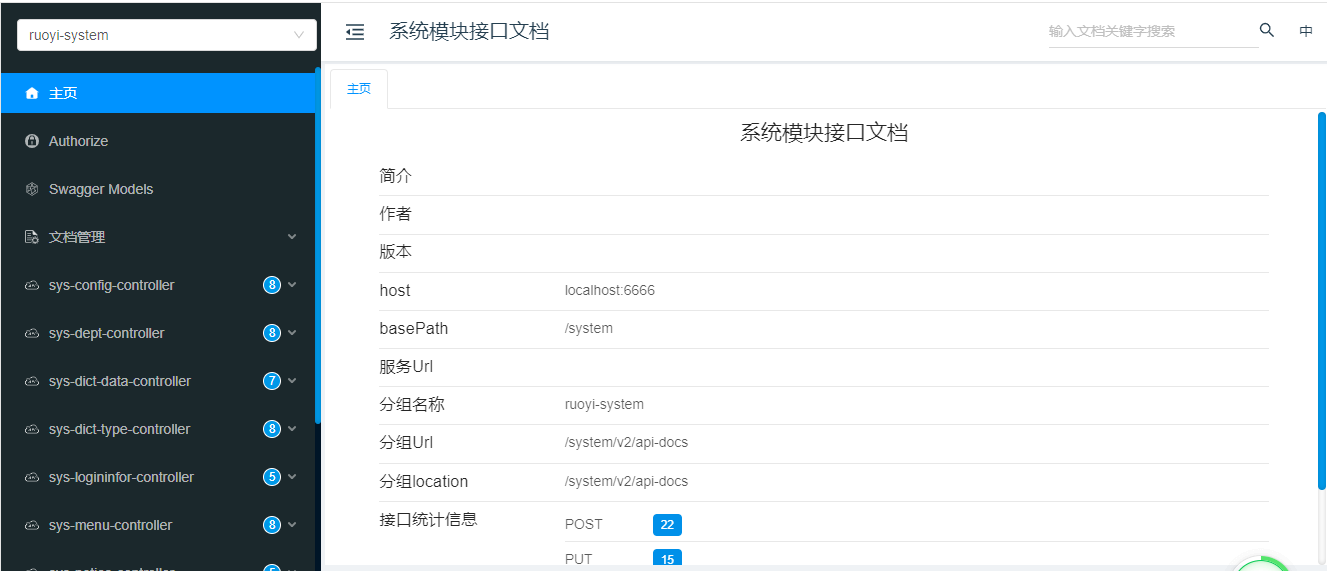
}4、测试验证
访问http://{ip}:{port}/swagger-ui/index.html地址,出现如下图表示成功。
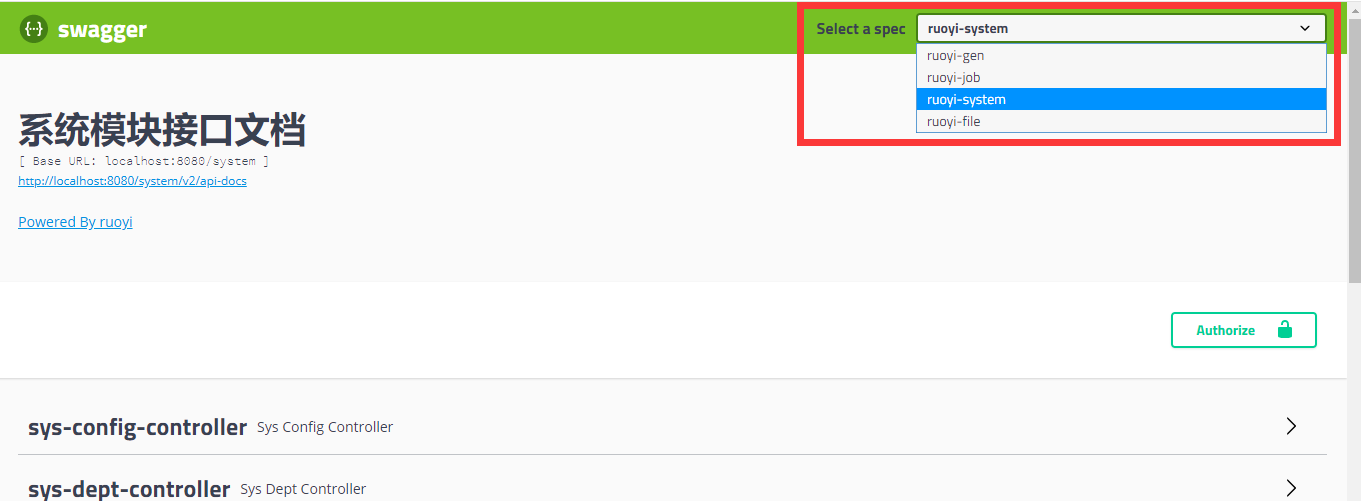
接口聚合
访问swagger-ui.html的时候会发现右上角的Select a spec这个下拉选项

当启动一个springboot项目的时候会发现这个下拉选项毫无用处,不过它的强大是在于这个下拉可以用来切换不同项目的swagger接口地址,这就实现了使用一个网关的url访问所有的项目接口。
1、网关模块添加依赖
<!-- SpringCloud Gateway -->
<dependency>
	<groupId>org.springframework.cloud</groupId>
	<artifactId>spring-cloud-starter-gateway</artifactId>
</dependency>

<!-- SpringCloud Alibaba Nacos -->
<dependency>
	<groupId>com.alibaba.cloud</groupId>
	<artifactId>spring-cloud-starter-alibaba-nacos-discovery</artifactId>
</dependency>

<!-- Swagger UI -->
<dependency>
	<groupId>io.springfox</groupId>
	<artifactId>springfox-swagger-ui</artifactId>
	<version>${swagger.fox.version}</version>
</dependency>

<!-- Swagger -->
<dependency>
	<groupId>io.springfox</groupId>
	<artifactId>springfox-swagger2</artifactId>
	<version>${swagger.fox.version}</version>
</dependency>2、网关服务创建一个类SwaggerProvider.java实现SwaggerResourcesProvider
import java.util.ArrayList;
import java.util.List;
import org.springframework.beans.factory.annotation.Autowired;
import org.springframework.cloud.gateway.config.GatewayProperties;
import org.springframework.cloud.gateway.route.RouteLocator;
import org.springframework.cloud.gateway.support.NameUtils;
import org.springframework.stereotype.Component;
import springfox.documentation.swagger.web.SwaggerResource;
import springfox.documentation.swagger.web.SwaggerResourcesProvider;

/**
 * 聚合系统接口
 */
@Component
public class SwaggerProvider implements SwaggerResourcesProvider
{
    /**
     * Swagger2默认的url后缀
     */
    public static final String SWAGGER2URL = "/v2/api-docs";
    /**
     * 网关路由
     */
    @Autowired
    private RouteLocator routeLocator;

    @Autowired
    private GatewayProperties gatewayProperties;

    /**
     * 聚合其他服务接口
     *
     * @return
     */
    @Override
    public List<SwaggerResource> get()
    {
        List<SwaggerResource> resourceList = new ArrayList<>();
        List<String> routes = new ArrayList<>();
        // 获取网关中配置的route
        routeLocator.getRoutes().subscribe(route -> routes.add(route.getId()));
        gatewayProperties.getRoutes().stream()
                .filter(routeDefinition -> routes
                        .contains(routeDefinition.getId()))
                .forEach(routeDefinition -> routeDefinition.getPredicates().stream()
                        .filter(predicateDefinition -> "Path".equalsIgnoreCase(predicateDefinition.getName()))
                        .filter(predicateDefinition -> !"ruoyi-auth".equalsIgnoreCase(routeDefinition.getId()))
                        .forEach(predicateDefinition -> resourceList
                                .add(swaggerResource(routeDefinition.getId(), predicateDefinition.getArgs()
                                        .get(NameUtils.GENERATED_NAME_PREFIX + "0").replace("/**", SWAGGER2URL)))));
        return resourceList;
    }

    private SwaggerResource swaggerResource(String name, String location)
    {
        SwaggerResource swaggerResource = new SwaggerResource();
        swaggerResource.setName(name);
        swaggerResource.setLocation(location);
        swaggerResource.setSwaggerVersion("2.0");
        return swaggerResource;
    }
}3、创建一个聚合接口类SwaggerHandler.java
import java.util.Optional;
import org.springframework.beans.factory.annotation.Autowired;
import org.springframework.http.HttpStatus;
import org.springframework.http.ResponseEntity;
import org.springframework.web.bind.annotation.GetMapping;
import org.springframework.web.bind.annotation.RequestMapping;
import org.springframework.web.bind.annotation.RestController;
import reactor.core.publisher.Mono;
import springfox.documentation.swagger.web.SecurityConfiguration;
import springfox.documentation.swagger.web.SecurityConfigurationBuilder;
import springfox.documentation.swagger.web.SwaggerResourcesProvider;
import springfox.documentation.swagger.web.UiConfiguration;
import springfox.documentation.swagger.web.UiConfigurationBuilder;

@RestController
@RequestMapping("/swagger-resources")
public class SwaggerHandler
{
    @Autowired(required = false)
    private SecurityConfiguration securityConfiguration;

    @Autowired(required = false)
    private UiConfiguration uiConfiguration;

    private final SwaggerResourcesProvider swaggerResources;

    @Autowired
    public SwaggerHandler(SwaggerResourcesProvider swaggerResources)
    {
        this.swaggerResources = swaggerResources;
    }

    @GetMapping("/configuration/security")
    public Mono<ResponseEntity<SecurityConfiguration>> securityConfiguration()
    {
        return Mono.just(new ResponseEntity<>(
                Optional.ofNullable(securityConfiguration).orElse(SecurityConfigurationBuilder.builder().build()),
                HttpStatus.OK));
    }

    @GetMapping("/configuration/ui")
    public Mono<ResponseEntity<UiConfiguration>> uiConfiguration()
    {
        return Mono.just(new ResponseEntity<>(
                Optional.ofNullable(uiConfiguration).orElse(UiConfigurationBuilder.builder().build()), HttpStatus.OK));
    }

    @SuppressWarnings("rawtypes")
    @GetMapping("")
    public Mono<ResponseEntity> swaggerResources()
    {
        return Mono.just((new ResponseEntity<>(swaggerResources.get(), HttpStatus.OK)));
    }
}
4、配置注册中心及路由信息
spring:
  profiles:
    # 环境配置
    active: dev
  cloud:
  	nacos:
      discovery:
        # 服务注册地址
        server-addr: 127.0.0.1:8848
    gateway:
      discovery:
        locator:
          enabled: false
          # 服务名默认必须大写,否则会抛404错误,如果服务名要用小写,可在属性配置文件中添加spring.cloud.gateway.discovery.locator.lowerCaseServiceId=true配置解决
          lower-case-service-id: true
      #default-filters:  #全局用于配置所有路由共享过滤器
      #  - StripPrefix=1 #去掉- Path=/auth 前缀
      #  - PreserveHostHeader #发送原主机头
      routes:
#          uri: https://www.baidu.com
#          predicates:
#            - Query=url,baidu
#        - id: qq_route
#          uri: https://www.qq.com
#          predicates:
#            - Query=url,qq  # localhost:88?url=qq
        #TODO 页面 http://localhost:88/product/api/product/**

        #-> http://localhost:10000/product/**
        - id: product_route
          uri: lb://gulimall-product # 路由给商品系统http://localhost:10000/product/**
          predicates:
            - Path=/api/product/**
          filters:
            # http://localhost:10000/api/product/**
            #->http://localhost:10000/product/**
            - StripPrefix=2
            - RewritePath=/api/(?<segment>.*),/$\{segment}
        #页面 http://localhost:88/api/api/member/*

       #->http://localhost:8000/member/**
        - id: coupon_route
          uri: lb://gulimall-coupon # 路由给用户系统http://localhost:8000/member/**
          predicates:
            - Path=/api/coupon/**
          filters:
            # 与商品格式一致
            # http://localhost:8000/api/member/**
            #->http://localhost:8000/member/**
            - StripPrefix=2
            - RewritePath=/api/(?<segment>.*),/$\{segment}
        # 页面路由网关都以http://localhost:88/api/开头,网关可以路由到指定服务


        # 页面 http://localhost:88/api/thirdparty/oss/policy/*
        #-> http://localhost:30000/oss/policy/*
        - id: third_party_route
          uri: lb://gulimall-third-party # 路由给第三方服务http://localhost:30000/oss/policy
          predicates: # 什么情况下路由给它  以下前缀路由给第三方服务
            - Path=/api/thirdparty/**
          # 路径重写 截掉/api/thirdparty/,留下/api/thirdparty/后的路径与网关路径拼接
          filters:
            # http://localhost:30000/api/thirdparty/oss/policy
            #-> http://localhost:30000/oss/policy
            - StripPrefix=2
            - RewritePath=/api/thirdparty/(?<segment>.*),/$\{segment}
        #页面 http://localhost:88/api/api/member/*

        #->http://localhost:8000/member/**
        - id: member_route
          uri: lb://gulimall-member # 路由给用户系统http://localhost:8000/member/**
          predicates:
            - Path=/api/member/**
          filters:
            # 与商品格式一致
            # http://localhost:8000/api/member/**
            #->http://localhost:8000/member/**
            - StripPrefix=2
            - RewritePath=/api/(?<segment>.*),/$\{segment}
        #页面 http://localhost:88/api/api/ware/*

        #->http://localhost:11000/ware/**
        - id: ware_route
          uri: lb://gulimall-ware # 路由给仓库系统http://localhost:11000/ware/**
          predicates:
            - Path=/api/ware/**
          filters:
            # 与商品格式一致
            # http://localhost:11000/api/ware/**
            #->http://localhost:11000/ware/**
            - StripPrefix=2
            - RewritePath=/api/(?<segment>.*),/$\{segment}
5、测试验证
打开浏览器,输入:http://localhost:88/swagger-ui/index.html
选择切换不同服务的swagger接口
全局授权
在测试系统接口中可能存在一些接口用到用户信息或权限验证,此时需要添加全局的token参数。如图
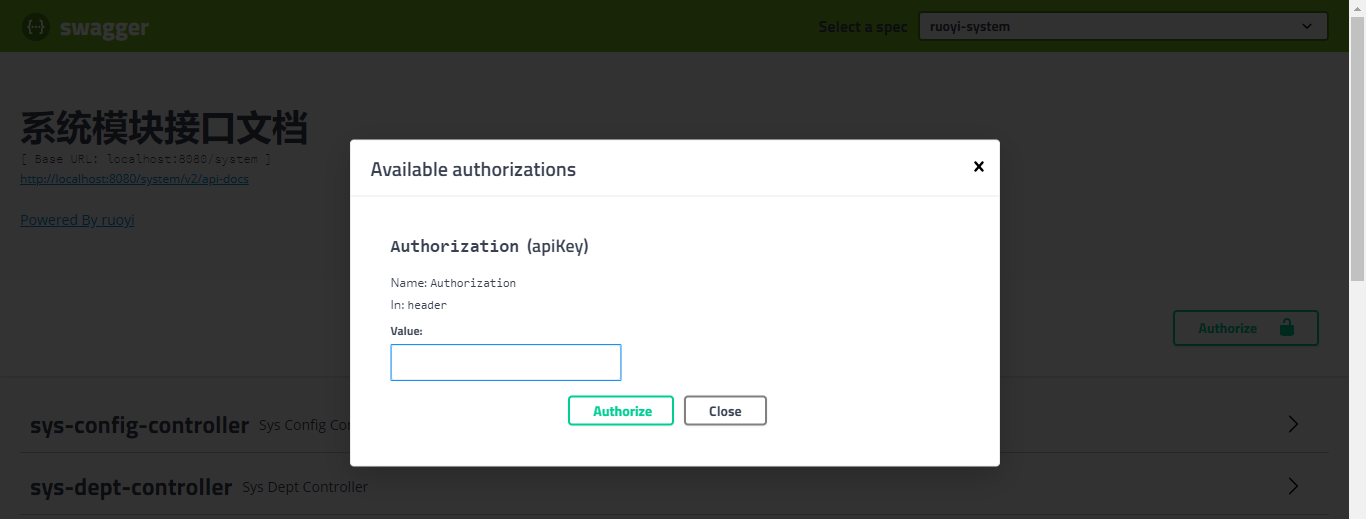
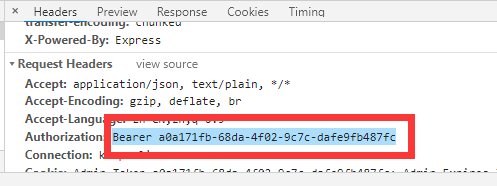
token是在登录成功后返回的,可以在浏览器通过F12查看Network中的请求地址,对应参数Authorization。复制截图内容到swagger全局Authorization属性value参数中,点击Authorize,以后每次访问接口会携带此token信息。
整合knife4j
在Spring Cloud的微服务架构下,每个微服务并不需要引入前端的ui资源,因此在每个微服务的Spring Boot项目下,引入ruoyi-common-swagger提供的starter即可。
1、在ruoyi-gateway网关模块下,把knife4j依赖资源引入
<!-- knife4j -->
<dependency>
	<groupId>com.github.xiaoymin</groupId>
	<!--  <artifactId>knife4j-spring-ui</artifactId> -->
    <artifactId>knife4j-micro-spring-boot-starter</artifactId>
	<version>3.0.3</version>
</dependency>
<dependency>
	<groupId>com.github.xiaoymin</groupId>
	<artifactId>knife4j-spring-boot-starter</artifactId>
	<version>3.0.3</version>
</dependency>2、在common-swagger系统接口模块下,把knife4j依赖资源引入
<!-- knife4j -->
<dependency>
	<groupId>com.github.xiaoymin</groupId>
	<artifactId>knife4j-spring-boot-starter</artifactId>
	<version>3.0.3</version>
</dependency>3、在其他mall-xxxx-xxxx服务下,把common-swagger依赖资源引入
<dependency>
    <groupId>com.klaus.gulimall</groupId>
    <artifactId>gulimall-swagger-spring-boot-starter</artifactId>
    <version>0.0.1-SNAPSHOT</version>
</dependency>4、在SwaggerProvider.java的类注解追加@Primary
@Slf4j
@Component
@Primary
@AllArgsConstructor
5、测试验证
访问http://{ip}:{port}/doc.html地址,出现如下图表示成功。
重复swagger依赖剔除
在
ruoyi-common-swagger引用knife4j-spring-boot-starter依赖,其中的springfox-swagger2依赖可以删除。 在ruoyi-gateway引用knife4j-spring-ui、knife4j-spring-boot-starter依赖,其中的springfox-swagger-ui、springfox-swagger2依赖可以删除。
swagger3.0和knife4j都需要SpringBoot2.3以上,否则报错
Q.E.D.